We completed a high-end tile installation in a beautiful luxury home in the prestigious Lewis Estates neighbourhood of Edmonton Alberta. Our team worked with top-quality materials to create a stunning, durable finish across multiple areas of the house.
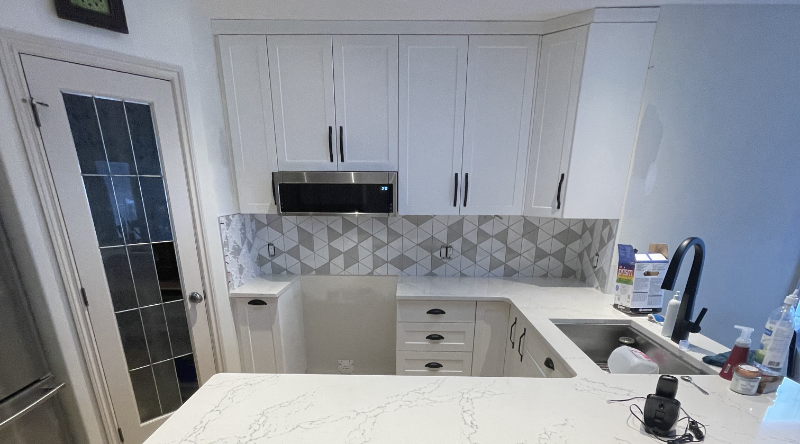
In the kitchen, we installed a 3×6 glass subway tile backsplash in a clean, straight-lay pattern. Using ReliaBond Tile Adhesive, we ensured a flawless and secure installation. This glass tile adds a modern, sleek element to the overall design.
Main Floor Tile Installation
Approximately half of the main floor was finished with elegant tile flooring. The homeowner chose glossy black 12×24 tiles, which we laid in a sophisticated 70/30 pattern. We used the 253 Gold Laticrete Mortar to ensure a strong bond, providing both style and durability for high-traffic areas.
Ensuite Bathroom Tile and Waterproofing
In the bathroom, we applied the Schluter Kerdi Membrane for waterproofing, combined with Premium Plus Mortar to install 12×24 tiles in a stacked pattern. The shower surround was extended to create a striking wall feature and vanity splash, adding a seamless, luxurious touch to the bathroom. For the shower floor, we used a mosaic tile that beautifully contrasts the light wall tiles and dark floor tiles, enhancing the bathroom’s design.
Fireplace Surround with Travertine Tile
Another standout feature in this luxury home is the custom fireplace surround. We used premium 8×36 travertine tiles, laid in a 60/40 pattern with ProLite Mortar, adding a touch of elegance to the living area.
Vanity Splash and Tub Surrounds in Bathrooms
Two of the bathrooms feature a vanity splash surrounding the mirrors, created with 3×6 black glossy subway tiles. These bathrooms also include tub surrounds, where we used the same glossy subway tile as an accent insert, complemented by 4×24 tiles for the rest. VersaBond Thin-Set was used to ensure a smooth, durable finish.
Basement Tile Flooring
The entire basement was tiled with 12×24 tiles. For large areas like this, we utilized a leveling system to prevent any lippage, ensuring a perfectly smooth surface. All 12×24 tile floors in this home were installed using 253 Gold Laticrete Mortar for superior stability.
Other Areas Tiled
Other sections such as the basement fireplace, the entrance tile and mudroom tile were also installed all in 12×24 format. Stacked pattern for the fireplace with the wall returns as well. 70 / 30 pattern for the entrance floor and the mudroom.
Final Touches
To complete this luxurious tile project, we used Prism Grout, a high-performance, stain-resistant grout, throughout the house. This ensures long-lasting beauty and easy maintenance.
Ready to Transform Your Home with Professional Tile Installation?
If you’re looking for expert tile installation that combines luxury, quality, and attention to detail, we’re here to help. Whether you need a stunning backsplash, durable flooring, or a custom bathroom design, our team has the experience to bring your vision to life. Contact us today for a consultation and let’s create a space you’ll love.
Call us at 587 333 9800. You could also email us at admin@thetileis.com or fill out this form below to get started!
Related Posts You Might Enjoy:
Enhance your kitchen with a stunning tiled backsplash by the specialistsWhat Are the Latest Trends in 2023 Tile Shower DesignBasement BathroomRenovation in Holyrood Edmonton
At The Tile Experts, we know how stressful it can be to discover mold behind your tub or shower tiles. Replacing a Tiled Tub Shower Surround Due to Mold. Mold can pose serious health risks, damage the structural integrity of your walls, and make your bathroom an unpleasant space. When this happens, removing the old tiles and replacing the tub surround becomes more than a cosmetic upgrade—it’s a crucial step in preventing further damage and ensuring the safety of your home.
While DIY might seem like a good option, mold remediation and tile installation are jobs that require precision, expertise, and professional-grade materials. In this article, we’ll explain the process of removing and replacing a tiled tub shower surround and why hiring professionals, like us, is the best choice to ensure the job is done right.
Bathrooms are notorious for moisture buildup. Without proper ventilation, mold can easily thrive behind the tiles in your tub or shower area. Whether due to cracked grout, poorly sealed joints, or leaks, mold can creep behind the walls and spread over time, weakening the structure and creating a health hazard.
If you’ve noticed signs of mold behind your tiles, it’s crucial to act fast. Leaving it untreated can lead to further spread and costly repairs. Unfortunately, just scrubbing the visible mold won’t address the problem—removing the affected tiles, treating the mold, and installing a new waterproof surround is the only long-term solution.
2. Why You Should Leave Tile Removal to the Experts
Removing a tiled tub shower surround is a delicate and potentially hazardous process. Here’s why hiring professionals makes sense:
• Safety and Health Concerns:
Mold can be harmful, especially for individuals with respiratory issues or allergies. Without proper protective gear and techniques, removing moldy tiles can release harmful spores into the air, putting your health at risk.
• Avoid Further Damage:
Removing old tiles and backer boards is tricky. If not done carefully, you could damage the underlying structure or plumbing, leading to costly repairs. Our team has the experience to ensure the job is done efficiently and without further damage.
• Comprehensive Mold Treatment:
Once we remove the tiles, we’ll assess and treat any mold that has spread beyond the surface. We follow industry standards to ensure the area is thoroughly cleaned and safe before installing new tiles.
3. Our Step-by-Step Process for Replacing Tiled Tub Shower Surround Due to Mold
Here’s how our team at The Tile Experts handles the removal and installation process:
• Inspection and Preparation:
We begin by inspecting the affected area to determine the extent of the mold damage. Next, we turn off the water supply, remove fixtures, and protect your tub with coverings to prevent damage during tile removal.
• Tile and Backer Board Removal:
Using professional tools, we carefully remove the old tiles and backer board. We then inspect the wall cavity for mold or structural damage. If we find any compromised areas, we’ll repair them before proceeding with the new installation.
• Mold Treatment:
After removing the old materials, we thoroughly treat the exposed area with mold-killing solutions, ensuring the space is clean and safe. This step is critical for preventing future mold growth.
• Installing New Waterproof Backer Board and Tiles:
We install a high-quality, moisture-resistant backer board, which is essential for protecting your walls from future water damage. Then, we install waterproofing membrane and use precision to lay new tiles, ensuring a perfect fit and finish.
• Grouting and Sealing:
Once the tiles are set, we apply high performance grout and seal the plane change lines with caulking to ensure a seal tight instalation.
4. Why Choose Us?
At The Tile Experts, we specialize in tile installation. Our experienced team is equipped to handle every aspect of the job, from safely removing moldy substrate to expertly installing a new, waterproof tub surround. Here’s why homeowners trust us:
• Professional Expertise:
We’ve handled countless mold-related tile jobs and know exactly how to diagnose and resolve moisture issues.
• Top-Quality Materials:
We use industry-leading, mold-resistant materials to ensure your new tiled surround will last for years.
• Save Time and Hassle:
DIY tile removal and installation can take weeks and often leads to frustration and costly mistakes. We’ll complete the project efficiently and correctly, so you can relax knowing the job is in expert hands.
• Guaranteed Satisfaction:
We stand by our work and offer a satisfaction guarantee. You’ll have peace of mind knowing that your new tub surround is beautiful, durable, and mold-free.
5. Contact Us Today
If you’ve noticed mold in your tub or shower area, don’t wait until it gets worse. Removing and replacing your tiled tub surround is a significant project that requires the right tools, experience, and materials to be done safely and effectively.
Let The Tile Experts handle the hard work for you. Our team will take care of everything—from removal of glass doors, mold removal to the final tile installation—ensuring your bathroom is both beautiful and safe. Contact us today for a consultation or to schedule your service!
Every winter, a significant number of Edmonton, Alberta, residents—commonly known as “snowbirds”—migrate south to escape the brutal Canadian winters. While this seasonal exodus to warmer climates like Arizona, Florida, or Mexico provides a much-needed respite from snow and ice, it also leaves homes in Edmonton unoccupied for extended periods. One of the most overlooked issues resulting from this is the drying out of toilet wax seals in these vacant homes, which can lead to severe water damage, mold, and even the need for extensive tile and substrate repairs.
Understanding the Snowbird Phenomenon in Edmonton
Snowbirds, typically retirees or semi-retirees, choose to spend the winter months in warmer regions to avoid the discomfort of Edmonton’s long, harsh winters. This lifestyle, while idyllic, requires homeowners to leave their properties vacant for several months—usually from November to April. During this time, the homes are left without the usual maintenance and checks, creating the perfect storm for various issues to arise, particularly in the plumbing and flooring areas.
The Role of the Toilet Wax Seal
A toilet wax seal is a critical component in any bathroom, sitting between the toilet base and the flange on the floor. This ring of wax forms a watertight seal, preventing water from leaking out when the toilet is flushed and blocking harmful sewer gases from entering the home. However, this seal depends on regular use and moisture to remain effective.
The Problem with Vacant Homes
When a home is left unoccupied for months, the water in the toilet bowls and traps evaporates. This evaporation causes the wax seal to dry out and lose its flexibility. Without the necessary moisture, the seal can crack or become brittle, leading to a compromised seal. As a result, when the homeowners return and flush the toilet for the first time, water can leak from the base, leading to potential water damage and even more serious problems like mold growth and structural rot under the tile flooring.
The Risks of a Dry Wax Seal
The primary risk associated with a dry wax seal is water leakage, which can lead to substantial damage if not addressed quickly. Initially, the leak might be slow and almost undetectable, but over time, it can cause significant harm to the flooring, subflooring, and tiles. As a company specializing in tile installation and repair, we’ve seen firsthand the extent of the damage that can occur when these leaks go unnoticed.
Key Issues Arising from Dry Wax Seals:
1. Water Damage to Flooring: Prolonged water exposure can weaken and damage not only the tiles but also the underlying substrate, leading to loose tiles and even the need for complete floor replacement.
2. Mold Growth: One of the most common issues we encounter is mold developing underneath the tile. Mold thrives in damp, dark environments, and a slow, hidden leak from a compromised wax seal creates the perfect conditions for mold to spread, potentially causing health risks and necessitating expensive remediation.
3. Rotting of Substrate: The substrate, or the material beneath the tiles, can rot if exposed to moisture for an extended period. In some cases, the entire substrate may need to be removed and replaced, which is a labor-intensive and costly process.
4. Extensive Repairs and Renovations: When water damage is severe, it may require the demolition of existing tiles, treatment of mold, replacement of the rotted substrate, and installation of new tiles. This not only drives up the cost but also increases the time your home is out of use.
Real-Life Impact: A Case Study from Our Experience
At The Tile Installations Specialists, we recently handled a project that perfectly illustrates the dangers of dry wax seals for Edmonton snowbirds. The homeowner had left their property vacant for several months while wintering in Arizona. Upon their return, they noticed water pooling around the base of the toilet and immediately contacted us for an inspection.
Before Renovation
During our initial assessment, we discovered that the toilet wax seal had dried out, leading to a slow, undetected leak. Over the months, this leak had caused significant water damage to the tile flooring, and mold had begun to grow beneath the surface. Worse, the moisture had also led to the rotting of the wooden substrate underneath the tiles.
During the Process
We began by carefully removing the tiles to expose the extent of the damage. As suspected, the mold had spread extensively, and the substrate was beyond repair. Our team undertook the task of safely removing the mold and completely replacing the damaged substrate.
Replacing the Substrate
Once the mold was treated and the substrate replaced, we proceeded with re-tiling the floor. We used high-quality tiles and grout to ensure durability and to restore the bathroom to its former condition.
Finished Project
The final result was a beautifully restored bathroom, free from mold and water damage. The homeowners were relieved to have the issue resolved and were extremely satisfied with the quality of the work.
If you happen to be in this situation go here and request an estimate and we are happy to walk you through the process.
Preventative Measures for Snowbirds
To avoid the risks associated with dry wax seals, and the extensive damage they can cause, Edmonton snowbirds can take several preventative steps before leaving for their winter retreat:
1. Turn Off the Water Supply: Shutting off the main water supply and draining the pipes can help prevent leaks during your absence.
2. Add Water or RV Antifreeze to Toilet Bowls: Adding RV antifreeze to the toilet bowls and traps can prevent water from evaporating, keeping the wax seal moist.
3. Seal the Toilet Bowl: Placing plastic wrap or a specialized cover over the toilet bowl can slow evaporation. When combined with antifreeze, this method can protect your wax seal throughout the winter.
4. Arrange for Regular Home Check-Ins: Having someone check on your home periodically can help detect issues early. Regular flushing of toilets during these visits can prevent the wax seal from drying out.
5. Upgrade to Advanced Toilet Seals: Consider replacing traditional wax seals with newer materials like rubber or foam gaskets, which are less prone to drying out and offer a more durable solution.
Addressing the Problem Upon Return
If you return from your winter escape and find that your toilet is leaking, it’s essential to address the issue promptly to avoid further damage:
1. Inspect for Leaks: Check the area around the toilet base for signs of water leakage. Look for damp spots, loose tiles, or musty odors indicating mold growth.
2. Replace the Wax Seal: If you detect a leak, the wax seal likely needs replacement. This involves removing the toilet, scraping away the old wax, and installing a new seal. Given the complexity, hiring a professional plumber or tile specialist is often the best course of action.
3. Assess the Extent of Damage: After replacing the seal, it’s crucial to inspect the surrounding flooring and substrate for any signs of water damage or mold. If damage is present, professional remediation may be necessary, including the removal and replacement of tiles and the underlying substrate.
4. Consider Full Restoration Services: If your home has sustained significant damage, our company offers comprehensive restoration services. We handle everything from mold treatment and substrate replacement to re-tiling and reinstallation of bathroom fixtures, ensuring your home is safe, sound, and beautiful.
Conclusion
For Edmonton snowbirds, the joy of escaping winter’s chill comes with the responsibility of ensuring their homes remain protected while unoccupied. One of the most significant risks involves the drying out of toilet wax seals, which can lead to leaks, mold, and extensive damage to the tile flooring and substrate.
By taking proactive steps before leaving and addressing any issues promptly upon return, you can protect your home from the hidden dangers associated with dry wax seals. If you do find yourself facing water damage, mold, or rot beneath your bathroom tiles, The Tile Installations Specialists is here to help. We specialize in restoring damaged bathrooms to their former glory, ensuring that your home is ready to welcome you back from your winter retreat without a hitch.
DIY Tile Installation; should I do it? At The Tile Installations Specialists we like to create a sense of awe in everything we do and part of that is transforming spaces with the art of tile craftsmanship. Whether it’s a sleek subway tile for your backsplash or a durable 12×24 porcelain for your entrance, the right tile can elevate your home. But the question we often encounter is: Should you attempt tile-setting on your own? Let’s explore this together.
Firstly, understanding the scope of your tiling project is crucial. A small backsplash area in your kitchen? Perhaps a manageable undertaking…. maybe… depending on the tile you choose. However, flooring an entire room or a complex pattern may require precision and expertise beyond casual DIY skills. Here is a blueprint for a major bathroom reno to help you on large projects. Consider the size, location, and purpose of the tiled area. These factors can influence the complexity of the job and the materials needed.
Tools & Materials
DIY tile-setting requires specific tools and materials such as tile cutters, trowels, spacers, mortar, and grout. At TTIS, we utilize professional-grade equipment for precision and longevity. Inadequate tools can lead to uneven cuts, poor adhesion, and ultimately, a less durable finish. For those without these tools, the initial investment can increase the overall cost and complexity of the project.
Skills & Experience
Tiling is an art form. It requires a steady hand, an eye for detail, and experience. As professionals, we’ve spent years perfecting our craft, from understanding how to properly lay out a room to mastering the intricacies of how tile behaves in different conditions (exterior, interior, hot, steam showers, humid areas, enclosed areas). While some homeowners may have a knack for precision work, the experience gap can be a deciding factor in whether a DIY project will have a professional-quality finish.
Time Commitment
Consider the time you’re willing to dedicate to the project. Professional tilers like ourselves can tackle a job efficiently, thanks to our experience and focus. A weekend project for a DIYer can quickly turn into a multi-weekend saga with disruptions to your daily life and potentially unsatisfactory results if rushed.
Cost-Benefit Analysis
Cost is often a motivator for DIY, but it’s important to do a thorough cost-benefit analysis. The hidden costs of DIY include tool rental or purchase, material waste due to inexperience, and the potential need for future repairs. Conversely, hiring professionals like TTIS ensures the job is done right the first time, with workmanship guaranteed and even better we warranty all of our installations for as long as you own your home.
When to hire a pro
So, when should you definitely call in a pro? Jobs that demand waterproofing expertise, such as showers and outdoor tiles, large areas, and complex patterns or materials, are best handled by professionals. Not only for the sake of quality but for ensuring the longevity of your investment. Imperfect tiling can lead to water damage, loose tiles, and costly repairs down the line.
FAQ
Q: Do you know how many inches of subfloor is required by code in Edmonton for a tiled system on your floors?
A: A minimum of 1 1/4″ is required
Q: Do you know how to plan a layout? Small cuts on the edges is not acceptable. Watch for “U” cuts in certain sections because it isn’t always possible. Also for “L” cuts. Symmetry is a must. What are you willing to live with for the next 20-30 years of your life? A: If the answer is yes. Check pattern both ways. Check size tile (12×12 or 12×24 or hexagonal 8×9), pattern install (70×30, stacked, side to side or front to back), Grout size line, and measure the pattern on repeat until edge of area. Spend the extra time here to avoid problems after you’ve place tile with mortar and its drying.
Q: Are you going to be renting the tools? Buying the tools? A: Unless you’re planning on becoming a tilesetter after you finish your project, this will increase the cost of the project a lot and then tools will collect dust in storage.
Q: Do you know what mortar to use depending on the location of the tile application? Different size tiles require different mortars. A: This is pretty self explanatory. Depending on size of tile and location of application there are mortars to make your life easier and also a best project outcome.
Q: Application on different substrates? What do you do if you’re going on top of linoleum? Particle board? Top of tile? A: Mortar has moisture and particle board likes moisture. You do not want to install on particle board. Remove and install appropriate substrate prior to tile install. Do not install on top of linoleum, unless proper testing and priming of the substrate is done first.
Q: What material to use in a shower application? Drywall? Mold resistant drywall? Tile backboard? Cement board? A: As long as there is a waterproofing membrane installed after the boarding of the shower, you are 100% good. You could save money if you just use a waterproofing board and then just apply sealer on the joints.
Q: Are you confidently willing to put thousands of dollars in tile and material on the line to potentially save some money? And your own valuable time? A: It is up to each one of you.
Q: Have you ever had a quick and easy weekend DIY project turn into a month long nightmare? I know we have a fair share of our own. It can be really stressful on a marriage. A: How much do you value your time? How much do you value your marriage? These are really important before you jump into a DIY tile setting project.
Q: Why is tile installation so expensive? A: Tile installation extends far beyond the simple act of laying tiles. It involves a thorough and detailed process in which the tilesetter meticulously covers the designated area a minimum of seven times from start to finish, ensuring that the installation meets the highest standards of quality. This degree of scrutiny is a bare minimum and does not even take into account the added complexity when opting for intricate designs like chevron, herringbone, or complex multi-size tile patterns. Moreover, it’s important to recognize that tile laying is not just a task but an art form that demands specialized skills, precision, and a keen eye for detail. The process is elaborate and demands significant time investment, with a focus not only on ensuring the structural integrity of the installation but also on achieving a level of aesthetic excellence that complements the overall design vision. Rest assured, our commitment to these principles ensures that your tile installation will not only last but will also be a visual delight.
Conclusion: DIY Tile Installation
To sum up, DIY tile-setting can be a rewarding project for those with the time, tools, and modest ambition. However, the assurance of quality, efficiency, and expertise often makes the investment in professional services worthwhile, particularly in complex projects or high-stake areas of your home. At TTIS, we believe in doing it right while delivering beautiful, lasting results. You can find us on Facebook, Instagram, TikTok, and Youtube. Our website is full of resources for all of the DIY folks out there because we do want you to attempt it. BUT Remember… just because you can doesn’t mean you should.
Your kitchen is one of the most important spaces in your home, where you prepare meals and spend time with family and friends. As Tilers ourselves, we agree! It’s important that your kitchen reflects your personal style and makes you feel comfortable and at ease. One way to enhance the appearance of your kitchen is by installing a tile backsplash.
A backsplash is a vertical extension of the countertop that protects the wall from splatters and spills. A tile backsplash not only adds a protective layer to your kitchen but also enhances the aesthetics of the space. Here are some reasons why you should consider tiling your kitchen backsplash:
Protects your walls
Cooking can be a messy affair, with oil, sauce, and other ingredients splattering all over the place. A tile backsplash acts as a barrier that protects your walls from damage caused by splatters and spills. It’s much easier to wipe down and clean a tiled surface than a painted or wallpapered wall.
Adds style and character
A tile backsplash can add a lot of style and character to your kitchen. Tiles come in a wide range of colors, patterns, and textures, which can complement or contrast with your existing décor. You can choose a neutral color to create a subtle backdrop for your kitchen, or a bold pattern to make a statement.
Easy to clean
Cleaning a tiled backsplash is easy and hassle-free. Tiles are non-porous, which means they don’t absorb moisture or stain easily. All you need is a damp cloth or sponge to wipe down the surface and keep it looking clean and fresh.
Enhances the value of your home
If you’re planning to sell your home in the future, a tile backsplash can increase its resale value. A well-designed and installed backsplash can be a major selling point for potential buyers, especially if it complements the overall style of the kitchen.
Budget-friendly
Tiling your kitchen backsplash can be a cost-effective way to update the look of your kitchen without breaking the bank. Tiles are available at a range of price points, so you can choose a style and quality that fits your budget.
In conclusion, tiling your kitchen backsplash is a great way to protect your walls, add style and character to your kitchen, make cleaning easier, enhance the value of your home, and do it all within a reasonable budget. So, if you’re looking to update your kitchen, consider installing a tile backsplash – you won’t regret it! Find a Tiler near you and get your project started. Or if you are going to do it yourself keep looking on our Blog