Luxury Home Tile Installation in Lewis Estates: A Showcase of Premium Craftsmanship

We completed a high-end tile installation in a beautiful luxury home in the prestigious Lewis Estates neighbourhood of Edmonton Alberta. Our team worked with top-quality materials to create a stunning, durable finish across multiple areas of the house.

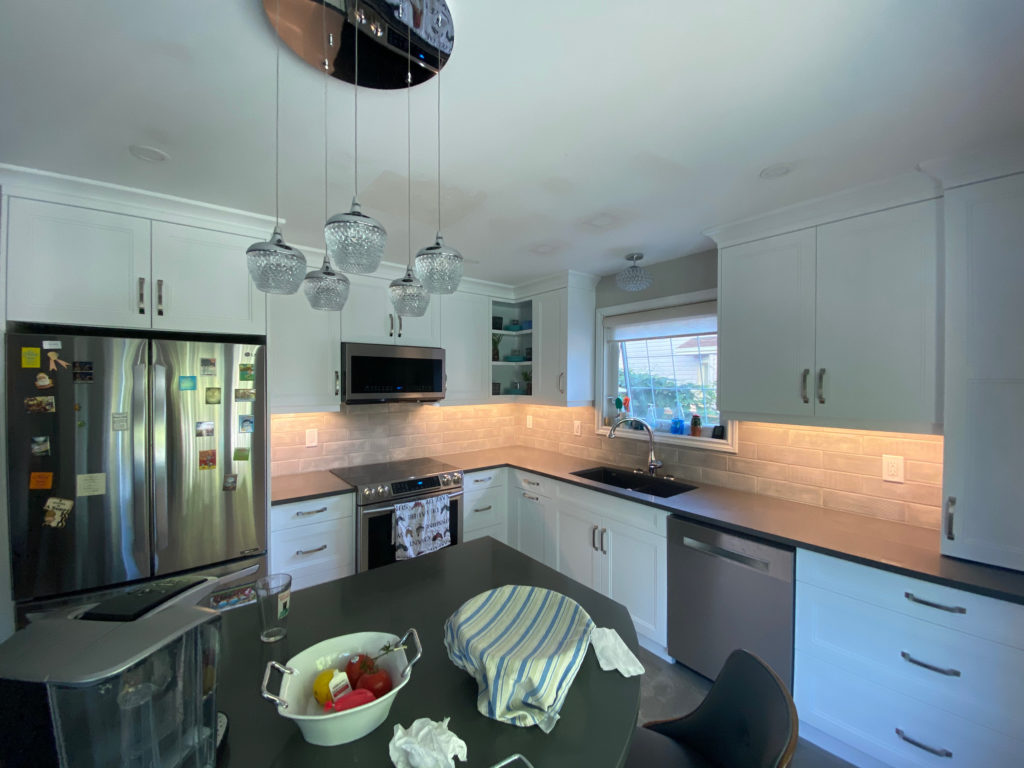
Glass Subway Tile Backsplash

In the kitchen, we installed a 3×6 glass subway tile backsplash in a clean, straight-lay pattern. Using ReliaBond Tile Adhesive, we ensured a flawless and secure installation. This glass tile adds a modern, sleek element to the overall design.

Main Floor Tile Installation

Approximately half of the main floor was finished with elegant tile flooring. The homeowner chose glossy black 12×24 tiles, which we laid in a sophisticated 70/30 pattern. We used the 253 Gold Laticrete Mortar to ensure a strong bond, providing both style and durability for high-traffic areas.

Ensuite Bathroom Tile and Waterproofing

In the bathroom, we applied the Schluter Kerdi Membrane for waterproofing, combined with Premium Plus Mortar to install 12×24 tiles in a stacked pattern. The shower surround was extended to create a striking wall feature and vanity splash, adding a seamless, luxurious touch to the bathroom. For the shower floor, we used a mosaic tile that beautifully contrasts the light wall tiles and dark floor tiles, enhancing the bathroom’s design.

Fireplace Surround with Travertine Tile

Another standout feature in this luxury home is the custom fireplace surround. We used premium 8×36 travertine tiles, laid in a 60/40 pattern with ProLite Mortar, adding a touch of elegance to the living area.

Vanity Splash and Tub Surrounds in Bathrooms

Two of the bathrooms feature a vanity splash surrounding the mirrors, created with 3×6 black glossy subway tiles. These bathrooms also include tub surrounds, where we used the same glossy subway tile as an accent insert, complemented by 4×24 tiles for the rest. VersaBond Thin-Set was used to ensure a smooth, durable finish.

Basement Tile Flooring

The entire basement was tiled with 12×24 tiles. For large areas like this, we utilized a leveling system to prevent any lippage, ensuring a perfectly smooth surface. All 12×24 tile floors in this home were installed using 253 Gold Laticrete Mortar for superior stability.

Other Areas Tiled

Other sections such as the basement fireplace, the entrance tile and mudroom tile were also installed all in 12×24 format. Stacked pattern for the fireplace with the wall returns as well. 70 / 30 pattern for the entrance floor and the mudroom.

Final Touches

To complete this luxurious tile project, we used Prism Grout, a high-performance, stain-resistant grout, throughout the house. This ensures long-lasting beauty and easy maintenance.

Ready to Transform Your Home with Professional Tile Installation?

If you’re looking for expert tile installation that combines luxury, quality, and attention to detail, we’re here to help. Whether you need a stunning backsplash, durable flooring, or a custom bathroom design, our team has the experience to bring your vision to life. Contact us today for a consultation and let’s create a space you’ll love.

Call us at 587 333 9800. You could also email us at admin@thetileis.com or fill out this form below to get started!

Please enable JavaScript in your browser to complete this form.
Name

Related Posts You Might Enjoy:

Enhance your kitchen with a stunning tiled backsplash by the specialists

Our experience with The Tile Installation Specialists was absolutely fantastic. They were quick to provide an accurate quote and answer any questions we had. We were booked in quickly and Ewald was always on time. Ewald was very clean and precise. I’m certain he left our house cleaner than when he found it. Our new backsplash is flawless and our kitchen now feels like home!

Google Review from Ashley B.

Transforming your kitchen can be as simple as adding a beautifully tiled backsplash. This small change can make a significant difference in the overall look and feel of your kitchen. If you’re new to tile installation, don’t worry—we’re here to guide you through the process.

At The Tile Installation Specialists, we’ve helped thousands of clients achieve their dream kitchen by installing stylish and functional backsplashes. Let’s take a closer look at how we turn your vision into reality:

Demolition & Preparation

  • We start by removing the old tiles and ensuring a clean slate. Our team takes care of disposing of the old materials and prepping the area for the new installation. Any necessary repairs, such as fixing the vapor barrier, are also addressed during this phase.

Installation

  • With a fresh canvas in place, we begin installing the new tiles. For this project, our client opted for a classic 2-inch by 8-inch subway tile, adding a timeless touch to their kitchen.

Grouting and Sealing

  • Once the tiles are in place, we tidy up the workspace by removing spacers, wedges, and tape. Then comes the grouting stage, where we apply the grout and any caulking sealant needed for a polished finish. Depending on the type of tile used, we may also apply a sealant to enhance durability and longevity.

Curing Process

  • It’s important to note that after the installation, there is a curing period before the final sealant can be applied. This typically ranges from 3 to 29 days, ensuring that the tiles set properly and are ready for long-term use.

The entire process usually takes 2 to 3 days for an average-sized kitchen backsplash of around 30 to 35 square feet. The result? A stunning and functional addition to your kitchen that not only enhances aesthetics but also adds value to your home.

Ready to elevate your kitchen with a tiled backsplash? We, at The Tile Installation Specialists can do just that. Let’s get started on your kitchen transformation!

Kitchen Backsplash and why is it important

When it comes to kitchen design, the backsplash is one of the most important elements. A tiled kitchen backsplash not only adds a stylish touch to your kitchen but also serves a practical purpose. It serves as a shield from water, grease, and food splatters that can discolor your walls and create an unsightly mess.

A tiled kitchen backsplash not only adds a stylish touch to your kitchen but also serves a practical purpose.

Tiles are an ideal material for kitchen backsplashes since they are durable, waterproof, and easy to clean. Tiles come in a variety of shapes, sizes, colors, and textures, so you can customize your kitchen to fit your personal style. You can even mix and match different tiles to create a unique look.

Tiles are also great for creating a focal point in your kitchen. Whether you choose to feature a patterned tile or stick to a single color, you can use a tiled backsplash to create a beautiful accent wall. You can also use tiles to frame a window or even as a border around your countertops.

Kitchen Backsplash – after shot

It adds style and personality to your kitchen while also protecting your walls from splatters and spills.

Another great advantage of a tiled backsplash is that it’s relatively easy to install. You can try and do-it-yourself and if you don’t see it possible you can hire a professional such as our company to install the tiles for you. Read more here or you can submit a request for an estimate here

Overall, a tiled kitchen backsplash is an essential element of any kitchen design. It adds style and personality to your kitchen while also protecting your walls from splatters and spills. With so many options available, you can easily find the perfect tiles to create the perfect look for your kitchen.

Tile Store Supplier we work with: